*Subscribe to my Patreon to get downloadable PDF versions of all my free crochet patterns! Available with all tiers. Join here!*
Do you want a quick and easy crochet project? Try making the “Little Chicken in the Nest”! This project takes only 20 minutes and requires no sewing. Perfect for beginners or anyone short on time. Just grab your yarn and hook, and follow my simple steps. You’ll have a cute little chicken in its cozy nest in no time. Great for gifts or decorations. Happy crocheting!
About :
This pattern is the intellectual property of Hugurumitoys. Use, copying, or sharing of this pattern on social media, blogs, or any other channels is not allowed. Republishing this pattern in any form is strictly prohibited. Any violation will be reported as an infringement of intellectual property and will result in legal action.
This pattern is written using US terms and is worked in continuous rounds, unless stated otherwise. If you use different hooks and yarn sizes, you may have to change safety eyes accordingly. Using the listed materials, the plushie will be around 10 cm tall. Due to your tension, you may have to change the position of the BBL stitches in order to align them.
Materials :
• 6 mm safety eyes (Buy here – Aliexpress)
• Stitch Marker
• Fiber fill (Buy here – Amazon)
• Yarn needles
• Chenille yarn 100 gr./120 m. (Buy here – Hobbii Yarn)
Abbreviations:
• MR – Magic ring
• CH – Chain
• SC – Single Crochet
• INC – Increase
• DEC – Invisible Decrease
• FLO – Front loop only
• BBL – Bobble stitch (3 half DC) VIDEO TUTORIAL HERE
To make a keychain follow this video tuorial HERE

Pattern / Head to body
In White.
Rnd 1. 8 sc into MR (8)
Rnd 2. 8 inc (16)
Rnd 3. 16 sc (16)
Rnd 4. 4 sc, BBL, 6 sc, BBL, 4 sc (16)
Rnd 5. 16 sc (16)
Rnd 6. 8 dec (8)
Fasten off, leaving a long tail for sewing.
Insert 6 mm safety eyes between rounds 4/5 and embroider the beak between them. (pic 1)
Stuff with fibre fill.
Close the open part with the tail as shown in picture 2, then bring the tail to the middle, exit at the bottom, and pull firmly to shape it. (pic 3)
To make the crest, attach a red yarn at the top of the head and make a chain of 2 chains, 1 hdc in the same stitch where you’ve attached the yarn, and close with 1 slst in the next stitch (Going towards the tail). (pic 4/5)

Nest :
In dark brown.
Rnd 1. 5 sc into MR (5)
Rnd 2. 5 inc (10)
Rnd 3. (1sc, inc) x 5 (15)
Rnd 4. (2sc, inc) x 5 (20)
Rnd.5. 20 sc (20)
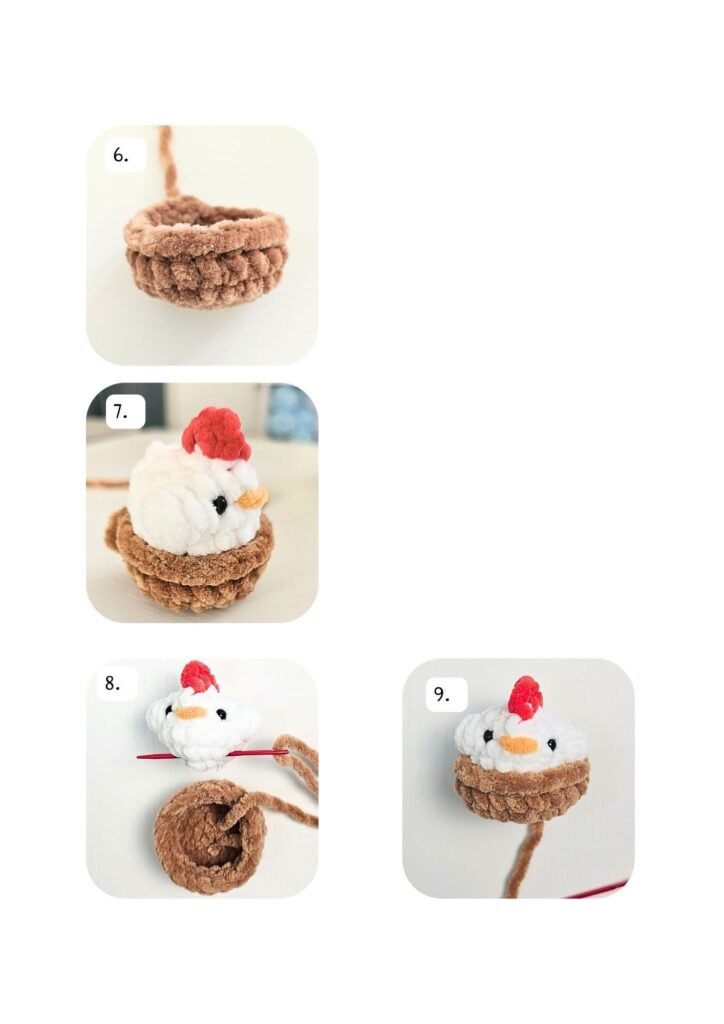
Rnd 6. IN FLO 20 slst (20) Crochet the slst very loosely.
Fastef off leavling a long tail for sewing.
Take the nest and bring the tail to the middle. With this tail, sew the chicken to it.

Congrats!
You’ve finished your little farmer friend! I hope you had fun making it and I’d love to see yours! Please tag me on Instagram @hugurumitoys if you post them! If you liked this pattern please leave a review and let me know what you think about it! Thank you and Happy Crocheting!
If you want to purchase the full pattern with the farmer bunny click here!


